I made these tartan bows to sell at my work craft fair. Packaged in cellophane (2 to a pack) they look quite cute!
Wednesday, 7 November 2012
Thursday, 11 October 2012
Christmas Crafting!!!
My work are having a Christmas Crafts sale on the 22nd of November.
Here's the first few tree decorations that I have made for the sale
Here's the steps to make these little tree decorations.
1. Cut squares of felt
2. Cut a length of ribbon
3. Sew the length of fabric onto the felt
4. Sew the two layers of felt together to make a border. Leave one side open to stuff with filling.
5. When sewing the last side of the border sew in the hanging ribbon.
6. Finished product
Interested in Ireland? Click here
Here's the first few tree decorations that I have made for the sale
1. Cut squares of felt
2. Cut a length of ribbon
3. Sew the length of fabric onto the felt
4. Sew the two layers of felt together to make a border. Leave one side open to stuff with filling.
5. When sewing the last side of the border sew in the hanging ribbon.
6. Finished product
Here are a few finished items - I sewed fabric hearts on some as well as the ribbon. I don't know which I prefer!!
Interested in Ireland? Click here
Sunday, 30 September 2012
House Renovations!
Over a year ago I bought a derelict house. I guess you could say this has been my biggest crafting project. If you are interested, c'mon over to my blog about it for lots of photos and info!
Saturday, 29 September 2012
Oktoberfest Costumes
Oktoberfest Beer Festival was on in Dublin last weekend. My sister and I dressed up as beer girls in dirndls for the event. Although we wore shop bought costumes we altered them by making waistbands for the dresses to make them look better.
Take a look! What do you think?!
Here is the waist band that Amy made
Interested in Ireland? Click here
Take a look! What do you think?!
Here is the waist band that Amy made
Sunday, 17 June 2012
Project 7 - Headboard
Project 7 - Headboard
This should be a good one!
I was showing Ciaran a bed headboard which was made out of a photograph printed on to canvas and I said I would like to do something like this.
He suggested that I make a headboard and that he would then paint it.
These are the colours we will use!
Pics to follow when I get started on the project!
Saturday, 9 June 2012
Project 6 - Bedside lockers
Project 6 is a big one!
I am currently in the process of moving house. Some of the furniture from the old house won't suit the new house. If you are interested in house restoration, please have a look at this blog.
In particular I have two red bedside lockers that will need to be repainted a more muted white or cream colour.
Here they are:
I am unsure whether I will leave the coloured tiling in these particular colour or whether I will paint over them.
Here they are after they have been painted with undercoat
And here they are finished. They are mainly painted White with a light grey for the top.
How do you think they look?
Thursday, 7 June 2012
Project 6 - Rocky Road
Honeycomb "Crunchie" bar was broken up in to big chunks.
Butter and chocolate were melted.
Biscuits were broken up
Mix the marshmallows, crunchie and biscuits into the chocolate and then pop in to the fridge to set.
Enjoy!
Butter and chocolate were melted.
Biscuits were broken up
Mix the marshmallows, crunchie and biscuits into the chocolate and then pop in to the fridge to set.
Enjoy!
Project 5 - Banoffee
OK so technically Baking is not crafting, so we decided to call what are doing "Caking" (Crafting + Baking) because we aren't actually cooking anything.
I am making Banoffee for the first time.
See below for step by step instructions with picture.
Spread the biscuit crumb into a cake tin.
I like the bananas to absorb the caramel taste so I go straight ahead and add them at this point.
Cream is then spooned over the base.
Here are the ingredients for the Banoffee Pie
250g digestive biscuits
100g butter
397g Carnation Caramel
4 small bananas
300ml whipping cream
Grated chocolate
I am making Banoffee for the first time.
See below for step by step instructions with picture.
For the Banoffee base, bash the biscuits into fine crumbs. Add melted butter to the biscuit.
Spread the biscuit crumb into a cake tin.
Spread the caramel over the base. A lot of people will chill this and only add the bananas and cream just before they serve.
I like the bananas to absorb the caramel taste so I go straight ahead and add them at this point.
Cream is then spooned over the base.
I then top with grated chocolate.
Here are the ingredients for the Banoffee Pie
250g digestive biscuits
100g butter
397g Carnation Caramel
4 small bananas
300ml whipping cream
Grated chocolate
Monday, 4 June 2012
Project 4 - Mobile Phone Art
My sister Amy made this cute little piece of art using two old phones that she and her husband both owned - the male and female version (one in pink the other in silver)!!! Not hard to guess who owned which one!
A shadow box frame was bought in Ikea.
And here is the finished piece!
I think it is a cute little picture!
Project 3 - Raggy Wreath
I wanted to try and make a "Raggy Wreath" after I saw a few on the Internet. Most seem to be made using a wire coat hanger but I decided to make my one differently.
I covered a polystyrene ring in ribbon.
I cut up fabric and ribbon in to little strips. I then pinned them to the ribbon covered ring.
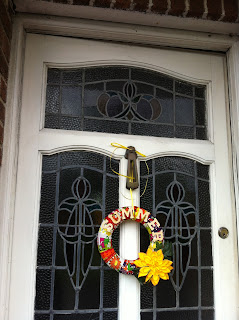
This is the finished wreath hanging on the front door!
Project 2 - Sequinned Heart
Amy set about making a sequinned heart.
She used a polystyrene heart, sequins and pins.
She covered the heart with lines of sequins.
A ribbon to hang the heart was pinned in to the heart.
Close up of the pinned ribbon
Here is the heart practically finished.
The heart decoration turned out very nice - will look gorgeous hanging on a Christmas tree or can be used as a Valentine's decoration.
Sunday, 3 June 2012
Project 1 - Summer Wreath
Amy and I are having a crafty day. I am making a wreath and my twin sister is making a sequinned heart decoration.
I will be making a wreath for my front door.
I will be converting this dress in to a wreath!
It's really pretty fabric. I wore the dress for the past few Summers but I no longer want to wear it. As far as I recall it cost less then €10 so I think I got value out of it - particularly if the wreath turns out nice!
Step by step photos of me making the wreath (Project 1) will follow along with Amy's sequinned heart (Project 2).
Here I am enjoying a lovely lunch prepared by my sister before we started our crafting!
It was smoked salmon and red pepper hummus on crusty bread with pain au chocolat for dessert. Delish!
By the way I should mention that this is the first time I've ever made a wreath so fingers crossed that it turns out ok!
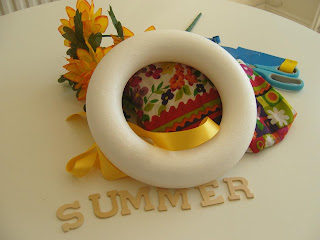
First thing you need for the wreath is a polystyrene ring
Remember the dress I showed you at the beginning of this post?
Well I cut it up in to strips and wrapped it around the ring.
Here is half the ring wrapped - I don't know why I am smiling because at this point I have stuck my fingers together twice with the super glue!!!
Fully covered polystyrene ring.
I then put a flower on the bottom right of the wreath
I then stuck on letters to make up the word "Summer".
- Update -
I gave this wreath to my mother for her front door - she loved it!
My mother joked that it was the only sign of Summer in Ireland as it has been a really rainy June!
I will be making a wreath for my front door.
I will be converting this dress in to a wreath!
It's really pretty fabric. I wore the dress for the past few Summers but I no longer want to wear it. As far as I recall it cost less then €10 so I think I got value out of it - particularly if the wreath turns out nice!
Step by step photos of me making the wreath (Project 1) will follow along with Amy's sequinned heart (Project 2).
Here I am enjoying a lovely lunch prepared by my sister before we started our crafting!
By the way I should mention that this is the first time I've ever made a wreath so fingers crossed that it turns out ok!
First thing you need for the wreath is a polystyrene ring
Remember the dress I showed you at the beginning of this post?
Well I cut it up in to strips and wrapped it around the ring.
Here is half the ring wrapped - I don't know why I am smiling because at this point I have stuck my fingers together twice with the super glue!!!
Fully covered polystyrene ring.
I then put a flower on the bottom right of the wreath
A little wreath hanging on Amy's front door!
- Update -
I gave this wreath to my mother for her front door - she loved it!
My mother joked that it was the only sign of Summer in Ireland as it has been a really rainy June!
Subscribe to:
Comments (Atom)


